


Key Takeaways
Aspect |
Key Points |
|---|---|
| Critical Spares | Chisels, bushings, through bolts, seals, and nitrogen charging kits |
| Maintenance Frequency | Daily inspections, weekly greasing, monthly nitrogen checks |
| Common Failures | Chisel wear, seal deterioration, bolt fatigue |
| Cost Savings | Preventive maintenance reduces repair costs by 60-70% |
| Downtime Reduction | Proper spare inventory cuts unexpected downtime by 80% |
| Expert Tip | Keep nitrogen pressure at manufacturer specs – low pressure kills breakers |
Understanding Rock Breaker Components and Wear Patterns
Rock breakers take a right beating in quarries and demolition sites. After twenty years working with these machines, I’ve seen every type of failure you can imagine. The chisel bears the brunt of impact forces, whilst the internal components suffer from constant vibration and pressure cycles.
Most operators don’t realise how quickly wear accumulates. A chisel might look fine on Monday morning, but by Friday it’s cracked internally. The through bolt connecting the chisel to the piston experiences tremendous stress – I’ve witnessed bolts that snapped clean through during routine operations.
Critical wear points include:
- Chisel tips and shanks
- Upper and lower bushings
- Through bolts and retaining pins
- Hydraulic seals and O-rings
- Accumulator bladders
The bushings deserve special attention because they guide the piston’s movement. When bushings wear, the piston starts moving off-centre, which accelerates wear throughout the entire system. I once saw a breaker where worn bushings caused £8,000 worth of internal damage before anyone noticed the problem.
Temperature affects wear rates significantly. Cold weather makes seals brittle, whilst extreme heat breaks down hydraulic oil faster. In Australian mining operations, I’ve observed seal failure rates triple during summer months compared to winter operations.
Essential Spare Parts Inventory Management
Smart contractors keep specific spares on hand because rock breaker failures don’t wait for convenient timing. I learned this lesson the hard way when a chisel failure on a Friday afternoon shut down our entire demolition project for three days.
Tier 1 Spares (Keep Multiple Units):
- Chisels (various sizes)
- Through bolts
- Retaining pins
- Basic seal kits
Tier 2 Spares (Keep One Set):
- Upper and lower bushings
- Complete seal rebuild kits
- Nitrogen charging equipment
- Hydraulic fittings
The chisel inventory requires careful planning. Different materials need different chisel designs – concrete work demands sharp points, whilst rock breaking needs broader tips. I typically recommend keeping three chisels per breaker: one working, one backup, and one being sharpened or repaired.
Through bolts fail without warning signs. Grade 8 bolts cost more initially but last significantly longer than standard grade bolts. After replacing dozens of failed bolts, I only use high-tensile versions now. The extra cost pays for itself by preventing catastrophic failures.
Seal kits often contain more parts than needed for basic repairs. However, keeping complete kits ensures you’re never missing a critical O-ring during repairs. Partial seal replacements usually lead to repeat failures within weeks.
Chisel Maintenance and Replacement Strategies
Chisels endure forces that would destroy most tools instantly. A single impact can generate over 1,000 bar of pressure, repeated thousands of times daily. Understanding chisel wear patterns helps predict failures before they occur.
Visual inspection reveals obvious damage, but internal cracks aren’t visible externally. I use magnetic particle testing on critical chisels to detect hairline cracks. This technique has prevented numerous catastrophic failures where cracked chisels would have destroyed the breaker’s internal components.
Chisel wear indicators:
- Mushrooming of the chisel head
- Visible cracks around the retaining pin hole
- Excessive play in the chisel mounting
- Reduced breaking efficiency
Sharp chisels break material more efficiently, reducing stress on the entire system. Blunt chisels force operators to increase pressure, which accelerates wear on bushings, seals, and the carrier machine’s hydraulic system. Regular resharpening extends chisel life by 40-60% compared to running them until failure.
Heat treatment affects chisel durability significantly. Overheated chisels during resharpening become brittle and fail prematurely. I always use temperature-indicating crayons during grinding to prevent overheating. Proper heat treatment maintains the chisel’s hardness whilst preserving toughness at the core.
Different applications require different chisel profiles. Demolition work benefits from narrow points that concentrate force, whilst quarry work needs broader tips that resist wear. Using the wrong chisel profile reduces efficiency and increases wear rates dramatically.
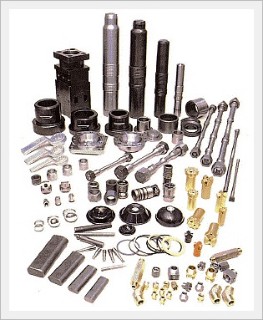
Hydraulic System Repairs and Seal Replacement
Hydraulic systems power rock breakers through extreme pressure cycles. Oil contamination causes 80% of hydraulic failures I’ve encountered. Particles smaller than human hair damage seals and create system-wide problems.
Seal replacement requires complete system cleanliness. Any dirt entering during repairs causes immediate seal damage. I always use clean assembly areas and fresh hydraulic oil during seal work. Contaminated oil kills new seals within hours of installation.
Seal replacement procedure:
- Drain hydraulic oil completely
- Remove accumulator pressure
- Disassemble components in clean environment
- Inspect all surfaces for damage
- Install seals using proper tools
- Refill with clean oil and test
O-ring installation demands careful technique. Twisted or damaged O-rings leak immediately. Using the correct installation tools prevents damage during assembly. I keep dedicated O-ring picks and installation sleeves for different seal sizes.
System pressure testing reveals marginal seals before they fail completely. Testing at 1.5 times operating pressure identifies weak seals that would fail under normal use. This approach prevents field failures that could damage expensive components.
Nitrogen Accumulator Service and Troubleshooting
Nitrogen accumulators store energy between hammer blows, providing consistent power delivery. Low nitrogen pressure reduces breaking efficiency and increases component wear. Most operators don’t check nitrogen pressure regularly, leading to premature failures.
Accumulator bladders wear out gradually, losing nitrogen slowly. By the time operators notice reduced performance, the bladder is usually completely failed. Weekly pressure checks prevent this scenario and maintain peak performance.
Nitrogen pressure symptoms:
- Correct pressure: Sharp, consistent hammer blows
- Low pressure: Weak, irregular impacts
- Zero pressure: Continuous hammering without breaks
Charging equipment must handle high-pressure nitrogen safely. Standard tyre inflators can’t reach the 150-200 bar pressure these systems require. Professional nitrogen charging kits include pressure regulators and safety equipment essential for proper service.
Temperature affects nitrogen pressure significantly. Cold weather reduces pressure by 10-15%, whilst hot conditions increase it. I always check pressure when machines reach operating temperature for accurate readings.
Pre-charge pressure varies between manufacturers and applications. Higher pressures provide more power but increase bladder wear. Lower pressures extend bladder life but reduce performance. Finding the optimal balance requires understanding specific application demands.
Preventive Maintenance Schedules and Best Practices
Preventive maintenance costs less than reactive repairs every single time. I’ve tracked maintenance costs across hundreds of breakers, and proper scheduling reduces total costs by 60-70% compared to run-to-failure approaches.
Daily inspections catch problems before they become expensive failures. Loose bolts, oil leaks, and unusual noises indicate developing issues. Five minutes of daily checking prevents hours of downtime later.
Daily maintenance checklist:
- Visual inspection for leaks
- Check chisel condition
- Verify nitrogen pressure
- Listen for unusual noises
- Grease lubrication points
Weekly deep inspections examine components more thoroughly. Checking bolt torques, measuring chisel wear, and testing hydraulic pressure identifies trends before failures occur. These inspections take 30 minutes but prevent costly breakdowns.
Monthly services include complete oil changes and seal inspections. Fresh oil removes contamination that damages seals and valves. Oil analysis reveals internal wear patterns and predicts component failures weeks in advance.
Record keeping tracks maintenance history and identifies patterns. Some breakers develop specific failure modes based on application or operator habits. Detailed records help predict and prevent recurring problems.
Common Failure Modes and Diagnostic Techniques
Rock breaker failures follow predictable patterns once you understand the underlying causes. Overloading causes different symptoms than inadequate maintenance, and proper diagnosis saves time and money during repairs.
Chisel failures often result from operator technique rather than component defects. Prying with the chisel, striking at extreme angles, or using excessive pressure accelerates wear dramatically. Training operators prevents 70% of premature chisel failures.
Diagnostic flowchart for common issues:
| Symptom | Likely Cause | Check First |
|---|---|---|
| Weak impacts | Low nitrogen pressure | Accumulator pressure |
| Irregular cycling | Contaminated oil | Hydraulic filter |
| Excessive vibration | Worn bushings | Bushing clearances |
| Oil overheating | Restricted return flow | Return filter |
| Rapid chisel wear | Incorrect technique | Operating procedure |
Vibration analysis identifies bearing and bushing problems before catastrophic failure. Handheld analysers detect frequency patterns that indicate specific component wear. This technique has helped me diagnose problems that weren’t obvious through visual inspection.
Pressure testing reveals hydraulic system problems that cause secondary damage. A partially blocked filter might not seem serious, but it forces the system to work harder, accelerating wear throughout. Regular pressure testing catches these issues early.
Sourcing Quality Parts and Managing Supplier Relationships
Parts quality varies dramatically between suppliers, and cheap parts often cost more in the long run. I’ve learned to evaluate suppliers based on part performance rather than initial price. Quality parts last longer and reduce unexpected failures.
OEM parts guarantee proper fit and material specifications, but aftermarket alternatives can provide good value for specific applications. The key is understanding which components require OEM quality and which accept lower-cost alternatives safely.
Parts sourcing strategy:
- Critical components: Use OEM parts only
- Wear items: Consider quality aftermarket options
- Standard hardware: Generic parts acceptable
- Safety items: Never compromise on quality
Supplier relationships matter more than single-transaction pricing. Reliable suppliers provide technical support, warranty coverage, and emergency availability. I’ve worked with suppliers who delivered critical parts within hours during emergency situations.
Inventory management balances carrying costs against availability. Expensive parts don’t justify large inventories, but critical wear items should be readily available. Understanding failure patterns helps optimise inventory levels for specific applications.
Part authentication prevents counterfeit components that could cause catastrophic failures. Reputable suppliers provide certificates of conformity and material traceability. Counterfeit seals and bolts have caused expensive failures that could have been prevented through proper sourcing.
Frequently Asked Questions
How often should I check nitrogen pressure in rock breaker accumulators? Check nitrogen pressure weekly when the breaker reaches operating temperature. Cold mornings give false low readings, whilst hot conditions show artificially high pressure. Proper pressure maintains breaking efficiency and extends component life.
What’s the most cost-effective spare parts strategy for small contractors? Keep chisels, through bolts, and basic seal kits in stock. These items fail most frequently and can shut down operations immediately. Partner with local suppliers for less common parts to avoid excessive inventory costs.
How do I know when bushings need replacement? Excessive play between the piston and housing indicates worn bushings. Measure clearances with feeler gauges – more than manufacturer specifications means replacement time. Worn bushings accelerate wear throughout the entire system.
Can I use automotive hydraulic oil in rock breakers? Never use automotive oil in rock breakers. These machines require high-pressure hydraulic oil with specific viscosity and additive packages. Wrong oil causes seal failures and reduces component life significantly.
What causes rapid chisel wear in rock breakers? Improper operating technique causes most rapid chisel wear. Prying, striking at extreme angles, and excessive pressure accelerate wear dramatically. Blunt chisels also increase wear by requiring higher pressures to break material effectively.
How do I prevent contamination during seal replacement? Work in clean environments using proper assembly techniques. Drain all oil, clean components thoroughly, and use fresh hydraulic oil during reassembly. Contamination kills new seals within hours of installation.
What’s the warning signs of accumulator bladder failure? Weak, irregular hammer blows indicate bladder problems. The breaker might cycle continuously without the characteristic pause between impacts. Complete bladder failure eliminates the energy storage that provides consistent power delivery.